I love it when I read about a new tech tool that someone raves about, but I’ve never heard of. I immediately jot down the name, what it’s good for, and who recommended it. Sometimes if it’s so fascinating to me (I have ADHD), I’ll go right to it. And other times it gets transferred onto a list in Trello. Let’s see if these 3 Favorite Time Saving Digital & Marketing Tools make your list.
Check out more of my favorite tools.
This brings me to the first of my favorite digital & marketing tools!
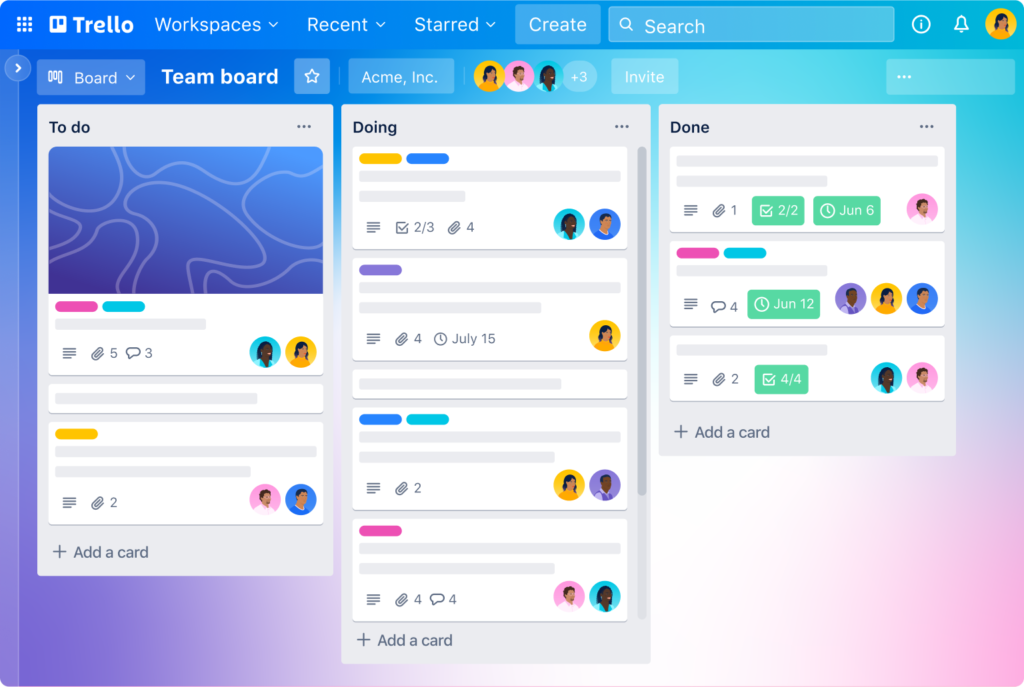
#1. TRELLO (digital tool)
After five years, I’m still exploring all the features of this fabulous digital tool. It’s perfect for my needs right now. And did I mention it’s free? At least the version I use is.
What it is.
Trello is a digital organizing tool that resembles bulletin boards. It’s also a task board. It’s a project management system. Let me explain.
Workspaces
You create workspaces (pages). And for each workspace, there are boards (columns). You
assign your boards’ titles. Each board has a card underneath that you assign a task or a note, whatever you choose to do. You can drag your boards and your cards around the page. You can even copy a board to another workspace and move a card to it too. If you don’t want to start a workspace from scratch, you can search the templates that may already have the boards you want.
Boards
Trello boards can be used for flow charts, reminder lists, to-do lists, and “I need to look into that later” back burner list, that can be called up anytime.
Functions
- Name your boards whatever you wish.
- Keep private boards.
- Shared boards with others.
- Color code boards and tasks.
- Add attachments, files, and photos to cards.
- Pretty boards and cards with photo screens.
- Star important boards.
- Delete boards.
The most fun I have with these boards is moving the cards around.
Here’s an example of how I use Trello
Let’s say I have a board named for a client and I name the main board my clients name. And I have tasks to do Monday through Friday for that client. I create boards next to one another, Monday, Tuesday, Wednesday, Thursday, and Friday. And at the end, I have a board named Done. If that Monday task doesn’t get done on Monday, I can just drag it to Tuesday. When I do complete the task, I drag that task card over to the Done board. Oh, the satisfaction of seeing that Done board fill up!
Another of my favorite digital & marketing tools!
#2. Buffer (marketing tool)
I’ve been a fan of Buffer for eight years. They have several plans from Free to Business to Pro plans.
What it is.
Buffer is a marketing tool but also a social media scheduling and content planning system. I use it to manage my clients’ content and my own as well. Over the years, they’ve added platforms and as of this writing, they allow postings for Facebook, Instagram, LinkedIn, Twitter, and YouTube shorts. I have to say, I’m a big fan of the drag-and-drop system because I just realized my next tool also uses drag-and-drop. But let’s go over some of the cool features that I use and are really helpful.
Create Content Once
First of all, you create content once and post it on all five platforms with one click by choosing “share now”. Now, you won’t want to be sharing them all at the same time. That’s ill-advised when using social media for business purposes. But…you can.
A better option is to set up your dates and times for each platform and have the content pushed out at those designated times. More details are below on this feature.
Easy on the eyes
Visually, this publishing tool is so easy on the eyes. It’s not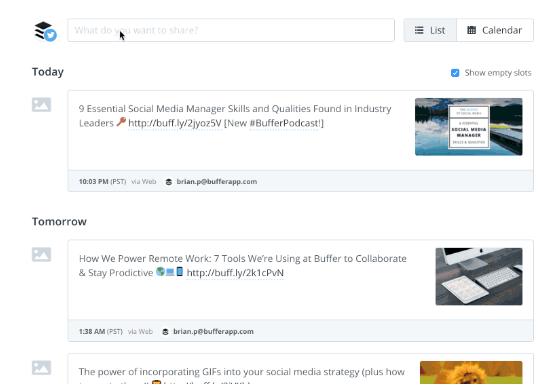 complicated and you don’t even need a tutorial to learn how to use it. It’s that simple!
Here are some cool things you can do besides posting. You can preschedule, ok I think that’s a given. But you add a schedule that you want. Let’s use this example. I want the same post of mine to go out to Facebook on Monday, Instagram on Wednesday, LinkedIn on Friday, and Twitter on Saturday. You set up the schedule in advance just once and every time you create that piece of content and put it in the funnel, it enters a queue and is sent off on those days and times like magic, that’s right…like magic.
Want to throw a lot of content into Buffer, go ahead. You can see all of your posts and photos when you scroll and you can change the order of the days by dragging a Monday to a Wednesday or vice versa. Want Buffer to shuffle your content, you can do that too.
Create Drafts
Not ready to schedule your posts, create drafts instead. You can edit them after saving them. And when you’re ready to share your drafts, you can schedule or send them immediately.
This is just the tip of the iceberg. Go to Buffer.com to learn more.
Lastly, the most used of my favorite digital & marketing tools!
#3 CONSTANT CONTACT (marketing tool)
You may be aware that I’ve been a Certified Partner with this brand. I’m approaching my 10-year anniversary soon! I’m able to offer a service to my clients that saves them both time and money while helping them grow their businesses using this resource.
What it is.
Constant Contact is an Email Service Provider (ESP) and a digital marketing tool. They have many more features than email marketing but I want to focus on that. First of all, they have a proven track record of success and helping small businesses grow for over 25 years. I like a solid company to partner with.
They have a simple drag-and-drop editor (as mentioned above) with a 3-part dashboard for creating email campaigns. Build-Images-Design. And hundreds of templates, most of which are done for you!
BUILD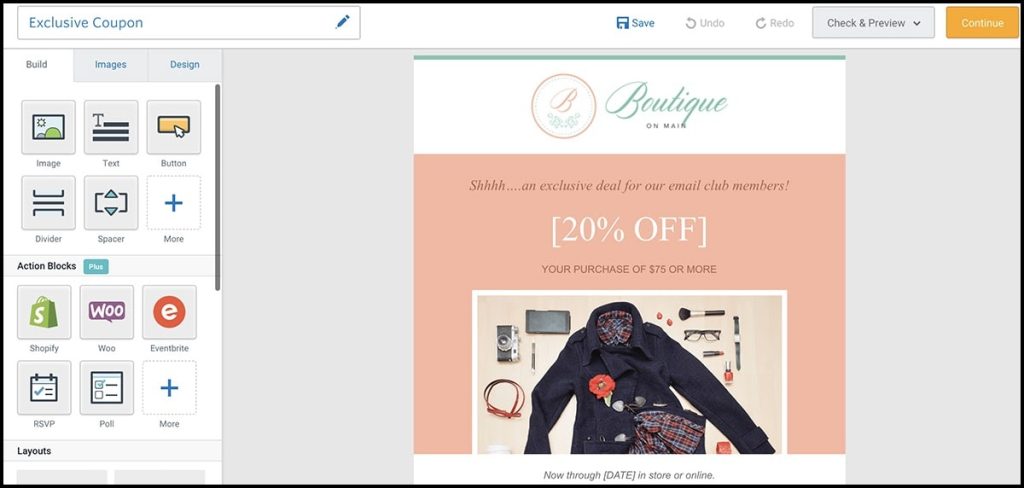
This area has “blocks” which are design placeholders you drag into a template for your content. Once the blocks are placed, you fill them in with content. The content I’m referring to is headlines, photos, text, buttons, social media sharing, etc.
IMAGES
This is your library of photos that you’ve uploaded into your account or want to upload into it and add to your emails.
DESIGN
This is your branding portal. It features backgrounds, borders, fonts, and buttons. You choose the colors, font types, and sizes here.
The Constant Contact software is extensive but it’s simple to use once you start using it regularly. Just like any new system you try has a learning curve. The advantage for you is that I’m a Constant Contact Certified Partner and can get you up to speed quickly, helping you with shortcuts. Even better, I can create, design and send your emails or you!
These three favorite time-saving digital and marketing tools might be just what you need if you want to be more productive, organized, and consistent with your marketing efforts.

Try Constant Contact for 60 days free.
No credit card is required.